
Gate of the Dead · player guide
The map and missions
The map is the part of the game you send people to and come back to later. Missions sit around the camp; pick one, choose a squad strong enough for it, and send them. They walk out and back on a timer. There's no fight to play and nobody dies, so there's always something worth doing on the map, even when every build has hours left.
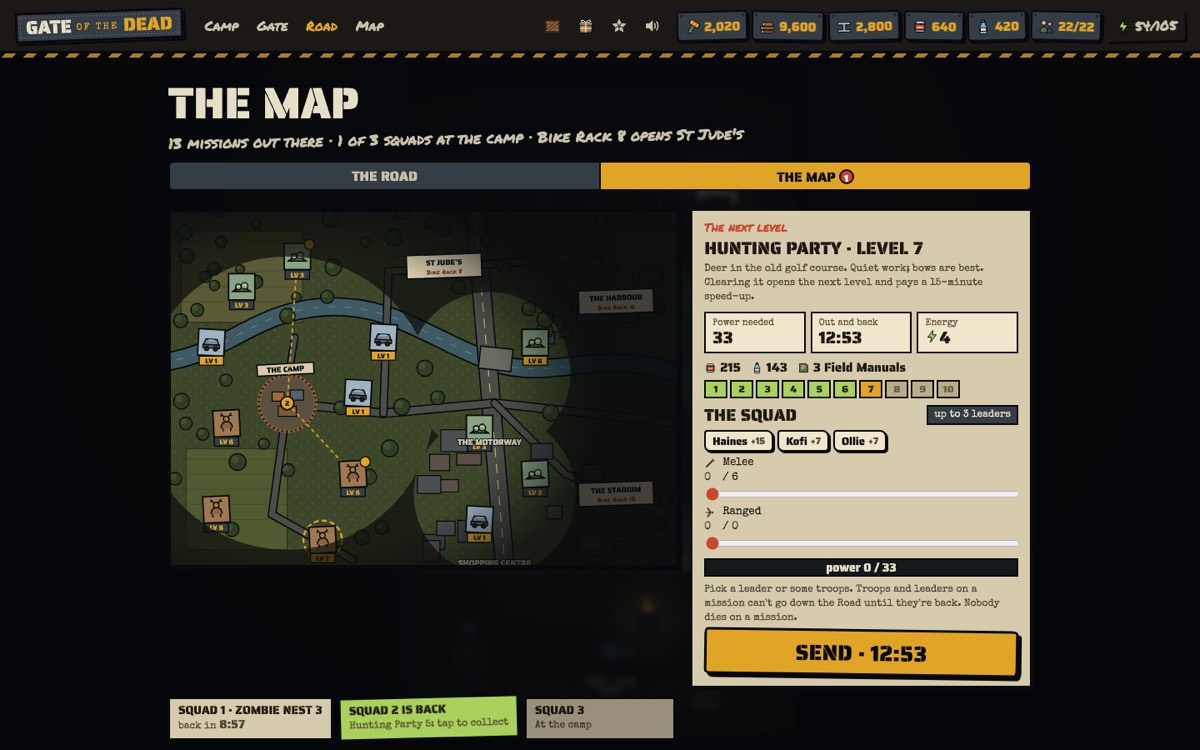
Opening the map
The map opens at Headquarters 3, early in chapter 2. Find it on the Road tab under The Map. There are always several missions on it: for each kind that's open, the next level to beat, plus lower levels you've already cleared to replay for loot.
Mission kinds
| Mission | Opens | Brings back |
|---|---|---|
| Hunting Party | Headquarters 3 | Food and water. Bows do well. |
| Zombie Nest | Headquarters 3 | Timber and steel |
| Scavenging Run | Headquarters 5 | Timber and Scrap Metal |
| Supply Drop | Chapter 6 | Scrap Metal and speed-up tokens; on the map for two hours only |
| Rescue | Chapter 7 | Survivors, and a chance of a Leader Key |
| Bandit Camp | Headquarters 8 | Scrap Metal, steel and ammo. They shoot back. |
Every mission also pays Field Manuals for your leaders.
Sending a squad
- Tap a mission to see its level, the power needed, the time out and back, and the loot.
- Pick up to three leaders and some melee and ranged troops. The squad's power is shown against what's needed. As on the Road, a mix of melee and ranged counts for more.
- If the power is enough, Send. It costs the Mayor 4 energy.
- Come back when the timer's done and collect. A low-level mission takes a few minutes; high levels and missions far from camp take a few hours.
You can have two squads out at once to start, then three at Bike Rack 5, four at 10 and five at 20.
Troops and leaders on a mission are away: they can't go down the Road until they're back. Plan big Road pushes for when your squads are home.
Levels and replays
Each kind of mission starts at level 1, and each level needs about a fifth more power than the last. The first clear of a level opens the next one and pays a 15-minute speed-up token; every fifth level also pays a Leader Key once you have the Leaders' Hall. Levels you've cleared stay on the map to replay for about 60% of the loot, which is handy when you need a particular material.
Several chapter goals ask for missions ("complete 15 missions", "clear a level 7 Zombie Nest"), and "complete 2 missions" is a common daily job.
Close runs and wounded troops
Nobody dies on a mission. But if a squad only just had the power needed, some troops come back wounded: up to a fifth of the squad when the power was just enough, and none at all if you sent half as much power again (150% of what's needed). Wounded troops rest at the First-aid Tent for an hour without one built, less as it grows, and can't be sent anywhere until they're better.
The map grows with the Bike Rack
At first only Riverside is clear. Each few Bike Rack levels lifts the fog off another area, with more spots for missions, and every new area adds one more mission of each kind to the map:
- The Motorway at Bike Rack 3
- The Shopping Centre at Bike Rack 5
- St Jude's at Bike Rack 8
- The Stadium at Bike Rack 12
- The Harbour at Bike Rack 16
Supply Drops
From chapter 6, a crate comes down on a parachute for two hours in every six. A Supply Drop pays 120 Scrap Metal and two 15-minute speed-ups and needs only modest power, so it's worth sending a squad whenever you see one.
Bringing a squad home early
If a squad has an hour or less to go, you can choose to watch an ad to bring it home now. That counts towards the daily limit of five ads.